How to Fix a Frozen AC Coil and Keep Your Home Cool All Summer Long

A frozen air conditioning coil can be a frustrating and potentially expensive issue for homeowners during the hot summer months. Not only can it cause your air conditioning system to stop working, but it can also lead to a range of other issues, such as reduced airflow and increased energy bills. However, with some basic knowledge and the right tools, fixing a frozen AC coil can be a relatively simple task. 

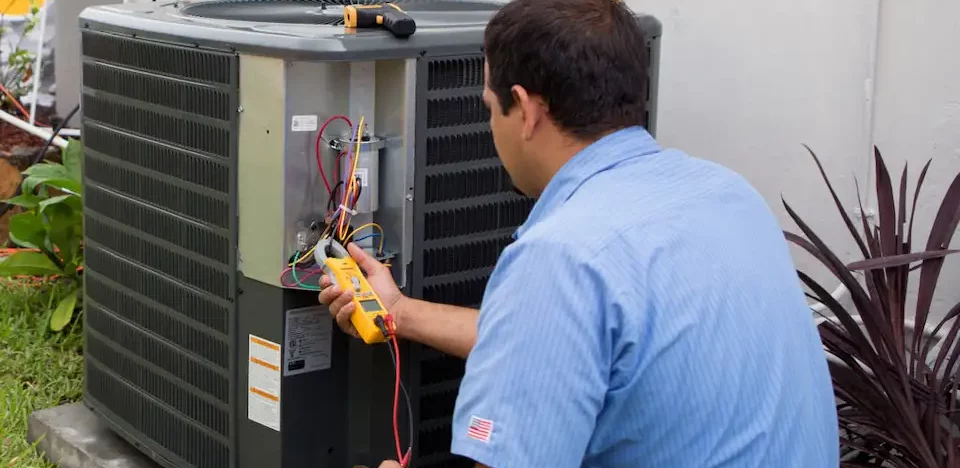
Our AC repair professionals at Bowman Mechanical Services are here to help by offering some tips and tricks for fixing a frozen AC unit and keeping your home cool and comfortable all summer long.

What Causes a Frozen AC Coil?

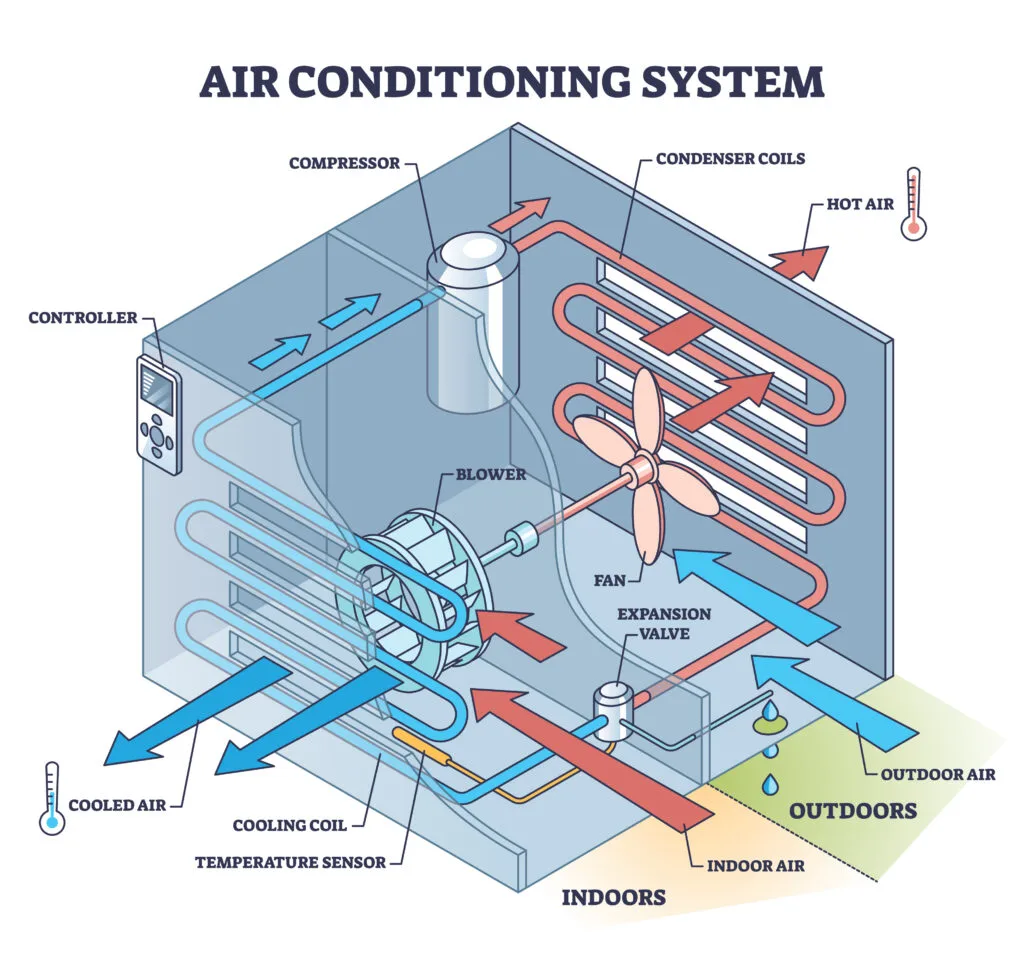
Frozen evaporator coils can be caused by a variety of issues, including a lack of airflow to your air conditioning unit due to a dirty air filter, low refrigerant levels, issues with the blower fan or motor, and a blocked or dirty evaporator coil. By understanding these common causes, you can take steps to prevent your AC from freezing and keep your unit blowing cold air all summer long.

why is my air conditioner freezing up

Lack of Airflow Due to a Dirty Air Filter

A dirty or clogged air filter can cause insufficient airflow over the evaporator coil in your HVAC system, which can cause the coil to freeze. A dirty filter can also cause your AC system to work harder than it needs to, leading to reduced energy efficiency and higher utility bills. In addition to preventing a frozen air conditioner, changing your AC filters regularly can also improve indoor air quality and extend the lifespan of your AC system.

Low Refrigerant Levels

The cold refrigerant is the substance that your AC system uses to cool the air that circulates through your home. If air conditioners have low refrigerant levels, this can cause the evaporator coil to freeze. Low refrigerant levels can be caused by leaks or other issues and should be addressed by an HVAC professional who specializes in cooling system repair.

Issues with the Blower Fan or Motor

The blower fan and motor are responsible for circulating the air over the evaporator coil and throughout your home. If these components are damaged or malfunctioning, it can cause inadequate airflow from the cooling system, which can in turn cause a frozen AC coil. Signs of issues with the blower fan or motor can include unusual noises, reduced airflow, or an AC unit that blows warm air.

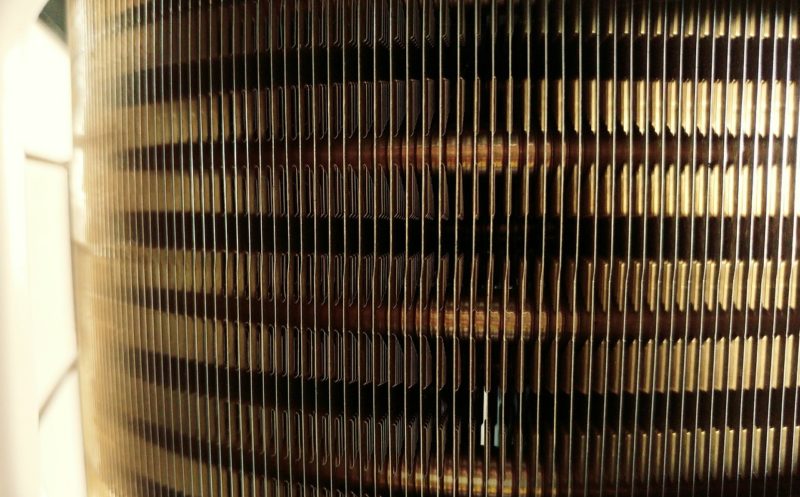
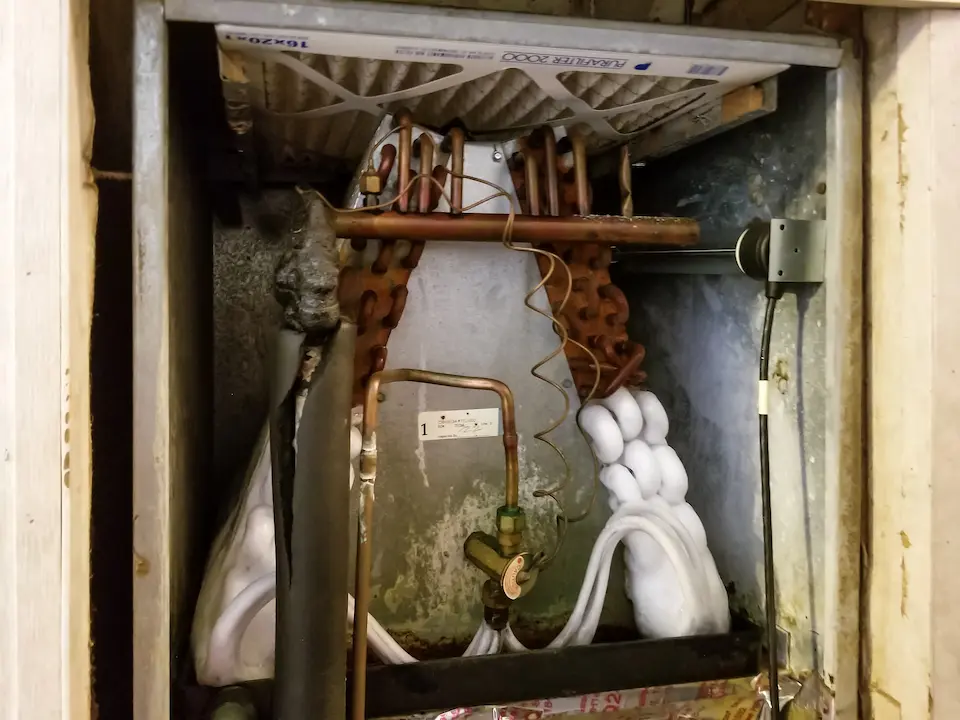
Blocked or Dirty Evaporator Coil

Over time, the evaporator coil in your AC system can become blocked or coated with dirt, dust, and other debris. This can restrict airflow and cause the coil to freeze. During an AC system maintenance service, the technician can inspect and clean the evaporator coil, ensuring efficient and effective cooling in your home.

How to Fix a Frozen AC Coil?

Fixing a frozen air conditioning coil is a relatively simple task that can be completed by following a few basic steps. Let’s explore the steps to fix a frozen AC coil for your home. 

STEP 1: Turn Off the AC Unit and Let the Ice Melt

The first step in fixing a frozen AC coil is to turn off the unit to allow the ice to melt. It’s important to give the coil time to thaw completely, as turning the system back on too soon can cause further damage. It’s recommended to wait at least 24 hours before turning the AC unit back on to ensure that the coil has thawed completely.

STEP 2: Replace the Air Filter

A dirty or clogged air filter can restrict airflow and cause the evaporator coil to freeze. After the ice has melted, it’s important to check the air filter and replace it if necessary. The frequency of air filter replacement varies depending on the manufacturer’s recommendations and usage, but it’s generally recommended to replace the air filter every 1-3 months.

STEP 3: Check and Add Refrigerant if Necessary

Low refrigerant levels can cause the evaporator coil to freeze. A professional HVAC technician can check the refrigerant levels and add more if necessary. If the system is low on refrigerant, it’s important to have a professional identify and repair any leaks to prevent future issues. Additionally, it’s important to note that adding too much refrigerant can also cause issues, so it’s best to leave this task to a professional.

STEP 4: Inspect and Repair the Blower Fan or Motor

Issues with the blower fan or motor can cause inadequate airflow, leading to a frozen AC coil. After the ice has melted, check the fan and motor for any damage or obstructions. If either component is damaged, it will need to be replaced. Additionally, it’s important to ensure that the blower fan is set to the proper speed and direction for optimal airflow.

STEP 5: Clean or Replace the Evaporator Coil

A blocked or dirty evaporator coil can cause the system to freeze. After the ice has melted, inspect the coil for any buildup or obstructions. The coil may need to be cleaned or replaced by a professional technician to ensure proper airflow and prevent future coil freezing. 

Prevention Tips to Avoid a Frozen AC Coil

By following these prevention tips, you can help avoid a frozen AC coil and keep your AC system running smoothly all summer long.

Regularly Replace Air Filters

When your air filter is dirty or clogged, airflow is restricted. This can cause the evaporator coil to freeze. To prevent this from happening, it’s important to regularly replace air filters. 

Schedule Routine Maintenance for the AC System

Regular preventative maintenance is essential to keeping your AC system running efficiently and effectively. A professional HVAC technician can identify and address any potential issues before they become major problems, helping to prevent a frozen AC coil. It’s recommended to schedule AC maintenance at least once a year, ideally in the spring before the start of the summer season.

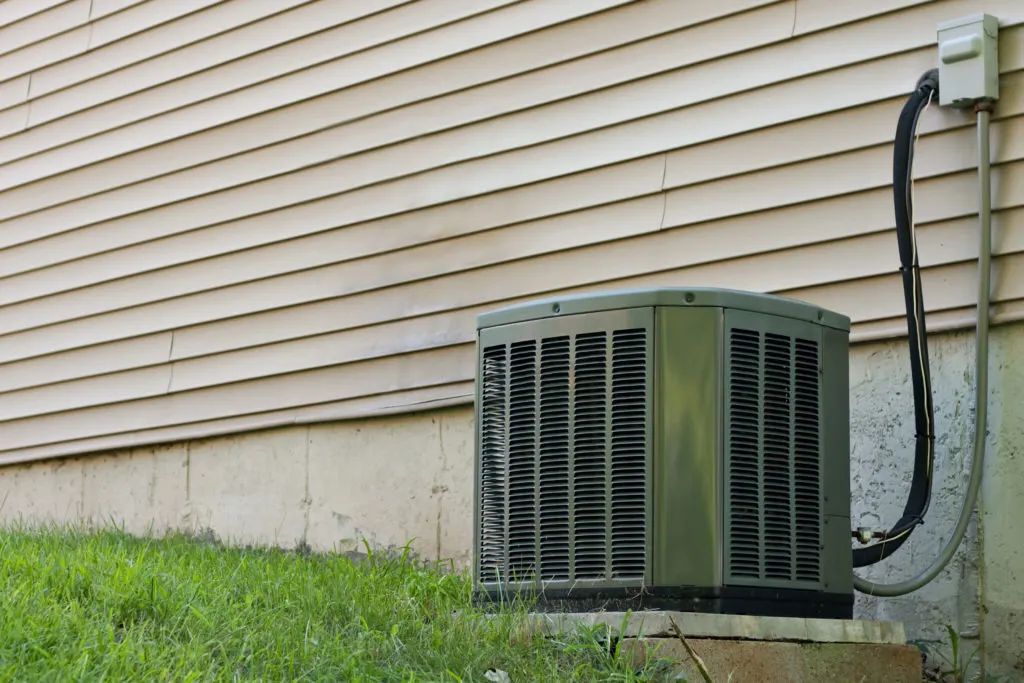
Keep the Outdoor Unit Clear of Debris

The outdoor unit of your AC system can become clogged with leaves, grass, dirt, and other debris. This can restrict airflow and cause the evaporator coil to freeze. To prevent this, it’s important to regularly clean the outdoor unit and keep it clear of any obstructions.

Ensure Proper Insulation and Ventilation in the Home

Poor insulation or ventilation in the home can cause the AC system to work harder than necessary, leading to potential issues such as a frozen AC coil. To avoid this, ensure that your home is properly insulated and ventilated. This includes sealing any air leaks, adding insulation to the attic and walls, and ensuring proper ventilation in areas such as the attic and crawl space.

Frequently Asked Air Conditioner Coil Questions

Can I continue to run my AC if the coil is frozen?

It’s not recommended to continue running your AC if the coil is frozen. Doing so can cause damage to the system and potentially lead to more serious issues. Instead, turn off the AC and let the ice melt before attempting to troubleshoot and fix the problem.

How often should I replace my air filter?

The frequency of air filter replacement varies depending on the manufacturer’s recommendations and usage, but it’s generally recommended to replace the air filter every 1-3 months. However, homes with pets, smokers, or high levels of air pollution may require more frequent filter changes.

What happens if I don’t fix a frozen AC coil?

If a frozen AC coil is left unrepaired, it can cause damage to the compressor, which is a costly and time-consuming repair. In addition, a frozen coil can lead to reduced energy efficiency and increased wear and tear on the system, which can result in costly repairs and a shortened lifespan of the system.

How can I tell if my AC unit is low on refrigerant?

Signs that your AC unit may be low on refrigerant include reduced cooling power, increased energy bills, and ice buildup on the refrigerant lines or evaporator coil. If you suspect that your AC unit may be low on refrigerant, it’s important to contact a local cooling system repair company for assistance. They can check the refrigerant levels and complete any necessary repairs or maintenance to ensure that your AC system is running efficiently and effectively.

Don’t Let a Frozen AC Coil Leave You in the Cold – Schedule Your AC Maintenance Today!

Don’t let a frozen AC coil leave you in the cold this summer! Ensure that your AC system is running smoothly and efficiently by scheduling an AC maintenance appointment with our HVAC technicians at Bowman Mechanical today. 

Contact us to inspect and maintain your system, including checking for potential issues that could lead to a frozen AC coil. With regular maintenance, you can avoid costly repairs and ensure that your home stays cool and comfortable all summer long. 

Contact us today by calling [phone] or filling out the contact form below to get started.

Why Is My AC Blowing Warm Air – 7 Troubleshooting Tips

ac blowing warm air

When the weather is hot outside, you expect your air conditioner to kick on and cool your home off fast. So, what happens if you notice your home isn’t cooling off, and warm air is coming out of the vents? Don’t panic – most of the time, this is a simple fix that you may even be able to do yourself.

Our Raleigh AC Repair team is here to bring you some tips to help keep your air conditioning system running smoothly throughout the summer months. From changing the filters and performing regular maintenance to checking for leaks, our team of experienced technicians can help you get the most out of your AC unit. We also specialize in emergency services so if something does go wrong, we’ll be there as soon as possible to get it fixed. No matter what your AC needs are, Bowman Mechanical Services in Raleigh is here to help you keep cool all summer long!

So, Why is Your AC Blowing Warm Air?

Check Your Thermostat Settings

Okay, we know this may sound silly, but you’d probably be surprised at how often someone has called for an AC repair only for the problem to be that the thermostat is on the wrong setting. So, the first thing you need to do is head to your thermostat and look for:

  1. The thermostat is set to “cool,” rather than “heat.” If it is, just switch it back over to cool.
  2. The fan is set to “auto,” rather than “on.” If the fan is set to “on,” it will blow non-stop, even when the AC is resting, so it will just blow warm air through the vents rather than cool. Switch it to auto, and it should be fine.

Clogged Air Filters

Clogged air filters can be the cause of an AC blowing warm air. A clogged filter prevents the airflow from passing through and therefore restricts the flow of cool, refreshing air being released into the room. This is especially true if the filter has been in use for several months without being replaced or cleaned. In addition, clogged filters can also cause high-pressure build-up within the system, leading to other problems such as frozen coils or compressor failure.

It’s important to ensure that your home’s AC filters are regularly changed every three months. Not only will this ensure maximum efficiency and improved performance of your AC unit, but it will also help prevent any avoidable issues such as warm air due to clogged filters. Additionally, homeowners should also make sure that their units are serviced annually by a qualified technician who can detect any potential issues with the system before they become major problems. Preventative maintenance is key when it comes to keeping your AC running smoothly and ensuring that it doesn’t blow warm air due to clogged filters.

Dirty or Frozen Evaporator Coils

If your AC is blowing hot air, it could be due to dirty or frozen evaporator coils. Dirty evaporator coils can cause a decrease in airflow and reduce the unit’s cooling efficiency. This will make the air that comes out of the vents feel warmer than normal. In addition, dirt and debris can block the coils, making them absorb heat from the surrounding environment instead of cooling it. If left unchecked, this issue can get worse over time and lead to your AC blowing warm or even hot air.

Frozen evaporator coils are another potential cause of warm air coming from your AC. When moisture on the evaporator coils drops below freezing, ice can form on them which blocks their ability to absorb heat from inside your home. As a result, no cool air will be produced by your unit and instead, you’ll feel nothing but hot air coming out of the vents. You may also notice frost build-up around other parts of your AC unit if this is happening. Trying to run your air conditioner with frozen or clogged coils can lead to overheating the unit or wearing out the compressor, so if you suspect this is the problem, try these steps:

  • Turn off the air conditioner at the thermostat.
  • Open the access panel by removing the small hex-head screws.
  • If you see ice on the coils, they’re frozen. Don’t try to clear away the ice by hand or with an implement as that can damage them.
  • Check the condenser drip pan to prevent an overflow as the coils thaw.
  • Wait for the coils to be completely free of ice before turning the unit back on.

Check Your Breaker Box

Your air conditioner has two parts – the outside condenser that cools the air down and the inside motor that moves cooled air through your ducts. When the outside condenser isn’t on, but the motor is still blowing air through, you’ll get warm air coming out of the vents.

Check your outside unit to see if it’s on and if it’s not, head over to your circuit breaker box to see if a breaker tripped. If it did, reset it and also check the on/off switch near your outdoor unit to make sure it’s set correctly. It’s important to note that if your circuit continues to trip, there may be too many electrical devices trying to run or it may need to be replaced.

Clear The Area Around The Air Conditioner

One step to consider when attempting to fix an AC unit that is blowing hot air is to clear the area around the unit. This means removing any debris, dirt, leaves, or other items that could be blocking the airflow. Doing this will help ensure that the unit can move air properly, which helps it stay cool and produces a comfortable temperature inside. Additionally, clearing away anything near the unit can ensure that the airflow is not blocked by furniture or other items. This can also help prevent any potential fire hazards that may occur due to too much dust buildup in the area.

By keeping debris and other items away from your AC unit you can also reduce overall energy costs. Poor airflow caused by clogged filters or dirty coils has to work harder than necessary to produce cool air, meaning your energy bills can increase dramatically. Additionally, a clogged coil system can lead to improper cooling of the condenser fan motor, causing it to overheat and potentially break down prematurely. By simply cleaning up around your AC unit regularly and making sure nothing is blocking its airflow you can help reduce energy costs and extend its lifespan.

Check For A Refrigerant Leak

Refrigerant leaks occur when a hole or crack develops in the air conditioning unit’s coils, tubing, or joints. This allows refrigerant, which is essential for cooling and dehumidifying the air, to escape into the atmosphere. A refrigerant leak can decrease the efficiency of your air conditioner and may lead to higher energy bills if it is not detected and repaired quickly. In addition, when inhaled, refrigerants can be harmful to humans and the environment.

To uncover if your AC unit is leaking refrigerant, there are several steps you can take. First, check all areas around your indoor and outdoor units for signs of an oil or liquid leak. If you notice any wetness on walls or floor near your AC unit this could indicate a refrigerant leak. Additionally, if you detect any abnormal smells coming from your system or feel that it isn’t cooling/dehumidifying as expected then your AC might need to be serviced as a precautionary measure. Finally, if any of these indicators are present it’s important to call an HVAC technician for professional help so they can properly inspect and repair the issue with your AC system.

Contact an Air Conditioner Repair Technician

If you’ve tried the above steps or they don’t seem applicable, turn off your air conditioner and call a local air conditioner repair technician. The issue could be a refrigerant leak, mechanical issue, or some other problem that requires a professional to diagnose and repair.

For homeowners in South Raleigh, Garner, and the surrounding area, reach out to Bowman Mechanical when your AC is acting up. We have an experienced team of technicians ready to restore comfort to your home. Reach out to us 24/7 for emergency service at  919-944-4603 or fill out our contact form below.

Discover the Benefits of Whole House Humidifier for Your HVAC System

Maintaining healthy humidity levels in your home is essential for ensuring optimal indoor air quality and a comfortable living environment. While many homeowners rely on portable humidifiers to improve air quality, a whole-house humidifier offers a more efficient and convenient solution. 

Our specialists in indoor air quality from Bowman Mechanical Services are sharing all the benefits of a installing whole-house humidifier and how it can improve the air quality inside your home.

What Is The Importance of Maintaining Proper Humidity Levels in Your Home

Maintaining proper humidity levels in your home is essential for several reasons. Low humidity levels can lead to dry skin, irritated sinuses, and increased respiratory problems, while high humidity levels can promote mold growth and cause damage to wood floors and furniture. Maintaining healthy humidity levels can improve indoor air quality, making a positive impact on your health and well-being.

Benefits of Installing a Whole House Humidifier

Here are some of the many benefits of having a central humidifier that controls the air inside your house:

  • Reduce respiratory conditions and asthma symptoms
  • Reduce allergy symptoms
  • Prevent dry skin and irritation
  • Prevent damage to wood floors and furniture
  • Create a more energy-efficient home
  • Reduce the cost of energy bills
  • Resist the production of mold growth caused by humid air
  • Reduce static electricity in the air

What Is The Ideal Humidity Level For a Home?

The ideal indoor humidity level for a home is between 30% and 50%. This range provides a comfortable living environment while minimizing the risk of mold growth and damage to wood floors and furniture.

What Is A Whole Home Humidifier?

A whole-home humidifier is a type of HVAC accessory that helps to maintain proper humidity levels throughout your entire home. It’s designed to work with your existing heating and cooling system to provide a consistent moisture level throughout your home.

Unlike single-room humidifiers, a whole-home humidifier is integrated into your home’s HVAC system, allowing it to provide humidified air to every room in your home. A whole-home humidifier can help improve indoor air quality, reduce respiratory problems, protect wood floors and furniture, save on energy costs, and reduce static electricity.

How a Whole House Humidifier Works

A whole-house humidifier works by adding moisture to the air as it passes through your HVAC system. It is typically installed in the return air duct or plenum of your HVAC system, and water is supplied to the unit either via a water line or a built-in reservoir.

When your HVAC system is running, the humidifier releases water vapor into the air that passes through the unit and into your home. The amount of moisture added to the air is controlled by a humidistat, which measures the humidity level in your home and adjusts the amount of moisture added to maintain the desired humidity level.

Whole house humidifiers can be set to a specific humidity level, typically between 30% and 50%, depending on the specific needs of your home.

Types of Whole Home Humidifiers

The type of whole-home humidifier that’s best for you will depend on the size of your home, your humidity needs, and your budget. Consulting with HVAC professionals who are experts in indoor air quality control can help you choose the right type of humidifier for your home.

There are several types of whole-home humidifiers available, including:

  • Bypass humidifiers: These types of humidifiers use the furnace blower to draw air from your home’s return air duct, pass it through a humidifier pad, and then back into your home’s supply air duct.
  • Fan-powered humidifiers: Fan-powered humidifiers work similarly to bypass humidifiers, but they use a built-in fan to circulate air through the humidifier pad, making them more efficient than bypass humidifiers.
  • Steam humidifiers: Steam humidifiers use electricity to boil water, creating steam that is released into your home’s ductwork. They are typically the most efficient type of humidifier and are ideal for larger homes or homes with higher humidity needs.
  • Drum humidifiers: Drum humidifiers use a rotating drum that is covered in a foam or fabric material that absorbs water. As the drum rotates, it passes through a reservoir of water, allowing the fabric to absorb moisture, which is then released into your home’s ductwork.

Whole House Humidifier Installation

Installing a whole-house humidifier can be a great way to maintain proper humidity levels in your home, but it’s important to make sure it’s installed correctly by a reputable HVAC contractor in Raleigh. 

Let’s look at some of the important factors to consider when installing a whole-house humidifier.

Choosing the Right Size Humidifier

The size of your humidifier will depend on the square footage of your home and your desired humidity level. An HVAC professional can help you choose the right size humidifier for your home based on these factors.

Choosing the Right Location for Humidifier Installation

A whole-house humidifier should be installed in a location that allows for the proper distribution of moisture throughout your home. It’s typically installed on the return air duct or plenum of your HVAC system, but the exact location will depend on the layout of your home and the specific HVAC unit in the home.

Installing a Humidifier within an Existing HVAC System

Whole-house humidifiers can be installed in existing HVAC systems. However, it’s important to ensure that your HVAC system is compatible with a humidifier and that the installation is done correctly to avoid any potential issues. Consulting with an HVAC humidifier professional can help ensure a smooth and successful installation.

Whole House Humidifier Maintenance

Proper maintenance of your whole house humidifier is essential for ensuring optimal performance and efficiency. This includes cleaning and maintaining your humidifier, changing the water panel, and monitoring humidity levels regularly.

Benefits of Humidifier Maintenence and Cleaning

Regular cleaning and maintenance of your whole house humidifier are essential to ensure its efficiency and longevity. Here are several reasons you want to schedule regular maintenance for your home’s humidifier:  

  • Optimal performance: Over time, mineral buildup and other debris can accumulate in the system, reducing its efficiency and effectiveness.
  • Indoor air quality: A well-maintained humidifier can help improve indoor air quality by reducing the amount of dry air in your home. 
  • Energy efficiency: Humid air feels warmer than dry air, which means you can set your thermostat lower while still feeling comfortable, reducing the amount of energy required to heat your home.
  • Prevent mold and bacteria growth: Without proper maintenance, whole-house humidifiers can become a breeding ground for mold and bacteria, which can be harmful to your health. Regular cleaning and maintenance can help prevent the growth of these harmful microorganisms and ensure the air in your home remains healthy and safe.

Considering A Whole House Humidifier? Contact Bowman Mechanical Today

At Bowman Mechanical Services, we specialize in the installation and maintenance of whole-house humidifiers. Contact us today to learn more about how a whole-house humidifier can improve your indoor air quality and provide a more comfortable living environment.

Proper installation and maintenance of your whole house humidifier are essential to ensure its efficiency and longevity, and our team of air quality experts can provide ongoing maintenance and support to keep your system running smoothly. From improving your home’s indoor air quality, reducing respiratory problems, protecting your wood floors and furniture, and saving on energy costs, installing a whole-house humidifier can make all the difference in the comfort of your everyday life. 

Contact us today at [phone] or get started by filling out the contact form below.

Best Mini Split for Garage – How to Choose the Right System for Your Space

If you’re looking for an efficient and effective way to cool your garage, a mini-split air conditioning system may be the perfect solution for you. However, with so many home cooling options on the market, it can be challenging to choose the right system for your space. That’s why our experts in mini-split systems from Bowman Mechanical are helping you take a closer look at the best mini-split systems for a garage, including how to choose the system that will work best for you. 

What is a Mini Split System?

A mini-split system is a type of HVAC unit that uses an outdoor compressor and one or more indoor air handling units to cool individual rooms or spaces. They’re called mini-splits because they don’t require ductwork, which means that they’re smaller and more flexible than traditional HVAC systems.

How a Mini Split System Differs from a Traditional HVAC System

Traditional HVAC systems use ducts to distribute cooled air throughout a building. In contrast, mini-split systems do not require ductwork, making them more energy-efficient and easier to install.

Traditional vs. Ductless Mini Split System

Traditional HVAC systems are typically more powerful and better suited for larger buildings or homes, while mini-split systems are ideal for cooling individual rooms or spaces.

Why Choose a Mini Split for Your Garage?

Ductless mini-split services

Choosing a ductless mini-split system for your garage is a great choice because it offers numerous advantages over traditional HVAC systems, window units, or portable air conditioners.

Mini-splits are more energy-efficient, resulting in lower energy bills, are quieter, and provide more consistent cooling capacity. Ductless mini-splits also require minimal square footage for installation, can be customized for zoning options, and provide precise temperature control. Mini-splits also require less preventative maintenance than traditional cooling units and can improve the indoor air quality of your garage space.

Overall, a mini-split system is an excellent choice for an air conditioner that is an efficient, convenient, and cost-effective way to cool their garage or living space.

Advantages of a Mini-Split Unit Over a Window Unit or Portable AC

There are several advantages of a mini-split system over a window unit or portable air conditioner, including:

  • Energy efficiency: Ductless mini-split systems are more energy-efficient than window units or portable air conditioners, which can save you money on your energy bills.
  • Quieter operation: Mini-splits are quieter than noisy AC window units or portable air conditioners, which can provide a more comfortable living environment.
  • Consistent cooling: Mini-splits provide more consistent cooling throughout your home or space, eliminating hot spots or uneven cooling.
  • Customizable zoning options: Mini-split air conditioners offer customizable zoning options, allowing you to control the temperature in different areas or rooms separately.
  • Precise temperature control: A ductless mini-split provides precise temperature control, allowing you to set the exact temperature you want for optimal comfort.
  • Improved indoor air quality: Mini-splits have air filters that can improve indoor air quality by removing allergens, dust, and other particles from the air.
  • Easy maintenance and cleaning: Ductless systems such as a mini-split require less preventative maintenance and cleaning than window units or portable air conditioners, making them more convenient to use.

Mini Split Heat Pump and Air Conditioning Combo Units

A mini-split heat pump and air conditioning combo unit is a type of mini-split system that provides both heating and cooling capabilities in one unit. It works by using a heat pump to transfer heat from the outdoor air to the indoor space during colder months and reversing the process during warmer months to provide air conditioning.

One of the primary advantages of a mini-split heat pump and air conditioning combo unit is that it can provide both heating and cooling capabilities with just one system, eliminating the need for separate heating and cooling systems. This can save space and installation costs while also providing year-round comfort.

Mini-split heat pumps and air conditioning combo units are also ideal for homes or spaces that don’t have ductwork or have limited space for ductwork installation. They can be installed in a variety of locations, including walls, ceilings, and floors, and offer customizable zoning options for precise temperature control.

Are Mini Split Heat Pumps with Cooling Power Good for Garages?

A mini split heat pump and air conditioning combo unit is an excellent option for those who need both heating and cooling capabilities in their garage.

Since a mini-split heat pump and AC combo system can provide both heating and cooling capabilities, it’s an ideal choice for use throughout the year in a garage that may be used for various purposes, such as a workshop, gym, or storage area.

How to Choose the Right Mini Split System for Your Garage

Choosing the right mini-split system for your garage requires careful consideration of several factors, including the size of your space, your cooling needs, and your budget.

Here are some tips to help you choose the right mini-split system for your garage:

  • Determine the size of your space: Measure the size of your garage to determine the square footage you need to cool. This will help you choose the right size mini-split system for your space.
  • Consider your cooling needs: Think about how you plan to use your garage and how much cooling power you need. If you plan to use your garage as a workshop or gym, you may need more cooling power than if you use it only for storage.
  • Choose the right type of mini-split system: There are different types of mini-split systems, including wall-mounted, ceiling-mounted, and floor-mounted units. Choose the type that is most appropriate for your garage layout and needs.
  • Look for energy efficiency: Consider only mini-split systems with high SEER (Seasonal Energy Efficiency Ratio) ratings as well as energy star products to save money on your energy bills.
  • Consider noise levels: If noise is a concern, choose a mini-split system with a low decibel rating.
  • Look for customizable zoning options: Mini-split systems with customizable zoning options allow you to control the temperature in different areas or rooms separately, providing more precise temperature control and energy savings.
  • Consider the brand and warranty: Choose a reputable brand with a good warranty to ensure quality and reliability.

By considering these factors, you can choose the right mini-split system for your garage that meets your specific needs and budget. Consulting with an HVAC professional with experience installing mini-split systems in garage spaces can also provide valuable guidance and recommendations.

Equip Your Garage With An Affordable Mini Split From Bowman Mechanical Services

Choosing the right mini-split heating and cooling system for your garage can be a challenging task, but with the right information and guidance, it’s easy to make an informed decision. At Bowman Mechanical Services, we offer a wide range of mini-split systems that are perfect for cooling and heating your garage.

Contact us today to learn more about our HVAC services and equip your garage with an affordable mini-split system that meets the needs of your space.

Call us at [phone] or fill out the contact form below to get started.

Mini Split vs Central Air: Which is the Best Air Conditioning System for Your Home?

When it comes to keeping your home cool and comfortable, choosing the right air conditioning system is essential. Two of the most popular options available on the market today are mini split and central air conditioning systems. While both options have their own benefits and drawbacks, it can be difficult to determine which one is best suited for your home. 

Our Raleigh air conditioning installation company is helping homeowners compare mini split vs central air conditioning systems. From understanding their differences in terms of cost, energy efficiency, installation, and maintenance, we hope to guide you in having a clearer understanding of which cooling system is the best fit for your home.

What Is A Mini Split Air Conditioner

Ductless mini-split services

A mini split air conditioner, also known as a ductless air conditioning system, is a type of air conditioner that does not require ductwork to cool a room or space. Instead, it consists of two main components: an outdoor compressor/condenser unit and an indoor air-handling unit.

Mini split air conditioners are ideal for homes or rooms where traditional central air conditioning systems with ductwork may not be feasible, such as in older homes without existing ducts or in rooms that require additional cooling but are too small to justify the installation of a central AC system.

How Does a Mini-Split System Work?

A mini split air conditioning system works by drawing in warm air from a room, passing it over the evaporator coil, and blowing the cooled air back into the room. It’s a highly efficient and effective way to cool individual rooms or spaces without the need for ductwork.

Here’s a breakdown of how a ductless mini-split system works:

  • The outdoor compressor/condenser unit compresses and circulates refrigerant in the system.
  • The indoor air-handling unit contains an evaporator coil that cools the air as it passes over it.
  • The indoor unit blows cooled air into the room through a fan.
  • The conduit, which connects the outdoor and indoor units, contains the refrigerant tubing, power cable, and condensate drain. The refrigerant tubing carries the refrigerant between the two units.
  • The mini split air conditioning system is controlled by a thermostat or remote control, allowing you to adjust the temperature and fan speed.

Advantages of Mini-Split Systems

Ductless mini-splits have become increasingly popular over the years due to their many advantages over traditional central air conditioner systems.

Energy efficiency

Unlike traditional ducted air conditioning systems, which can lose a significant amount of energy through ductwork, mini-split systems do not require ducts, making them more energy-efficient. Mini split systems also use inverter technology, which allows them to adjust their cooling output to match the needs of the room, reducing energy waste.

Easy installation

Unlike central air conditioning units that require extensive ductwork, mini-split systems only require a small hole in the wall for the conduit to pass through. This means that installation is typically quick and easy, and can be completed in a matter of hours, as opposed to days or weeks with a centrally controlled AC system.

Zoning capabilities

Mini split systems also offer zoning capabilities, which means that each indoor air-handling unit’s temperature settings can be controlled independently, allowing you to cool specific rooms or zones in your home without wasting energy on areas that don’t require cooling.

Disadvantages of Mini-Split Systems

While mini-split air conditioning systems have many advantages over traditional central air conditioning systems, there are also a few potential disadvantages to consider.

Higher upfront cost

The cost of a mini-split ductless AC system can be significantly higher, especially when factoring in the cost of professional installation. However, the energy savings that come along with lower monthly utility bills as well as the long-term cost benefits of using a mini-split system may offset the initial cost over time.

Less powerful

While mini-split systems are designed to cool individual rooms or spaces, they may not be sufficient for larger homes or commercial spaces that require more powerful cooling capabilities.

Requires professional installation

While the installation process is typically quick and easy, it can be more expensive than installing a traditional central air conditioning system since a professional is needed to install the unit. Additionally, improper installation can result in reduced efficiency and performance, as well as potential safety hazards.

What is a Central Air Conditioning System?

AC Services Raleigh

A central air conditioning system is a type of AC unit that uses ducts to distribute cooled air throughout an entire home or building. The system consists of an outdoor unit that houses the compressor, condenser, and fan, and an indoor unit that contains the evaporator coil and blower.

The two units are connected by a system of ducts that distribute cooled air throughout the building. Central air conditioning systems are typically controlled by a thermostat, which allows you to adjust the temperature and fan speed. They are ideal for larger homes or buildings that require consistent, whole-house cooling.

How Does a Central Air System Work?

A central air conditioning home cooling system works by using a series of ducts to distribute cooled air throughout a home or building.

Here’s a step-by-step breakdown of how a duct system central air conditioning unit works:

  • The outdoor unit houses the compressor, condenser, and fan. The compressor circulates the refrigerant through the system, while the condenser releases heat from the refrigerant.
  • The indoor unit contains the evaporator coil, which cools the air as it passes over it. The blower fan then blows the cooled air through the ducts and into the rooms of the house or building.
  • The ducts distribute the cooled air throughout the home or building, and return ducts draw warm air back into the system to be cooled again.
  • The central thermostat regulates the temperature by sensing the temperature of the air in the room and turning the system on or off accordingly.
  • The air filter in the system traps dust, pollen, and other airborne particles, ensuring that the cooled air circulated through the system is clean and healthy.

Advantages of central air systems

Central air conditioning systems have become a popular choice for many homeowners due to the advantages they offer over other types of air conditioning systems.

Powerful cooling

Unlike window or portable air conditioning units or ductless systems, which may struggle to cool larger spaces or multiple rooms, central air systems are designed to cool entire homes or buildings evenly and efficiently.

Low noise

The noisy components of a central system, such as the compressor and condenser, are located outside the home, so you won’t have to deal with the noise of a loud compressor running inside your home.

Improves indoor air quality

The air filter in the system inside central air conditioners traps dust, pollen, and other airborne particles, preventing them from circulating through the air in your home. This can be especially beneficial for those with allergies or respiratory issues, as it helps to keep the air clean and healthy.

Disadvantages of Central Air Systems

While central air conditioning systems have many advantages, they also have a few potential disadvantages to consider.

Higher energy usage

Central air systems have a higher energy usage compared to other types of air conditioning systems. This is because central air systems use ducts to distribute cooled air throughout the home, which can lead to energy loss through leaks and gaps in the ductwork.

More expensive to install

Central air systems can be more expensive to install than other types of air conditioning systems because they require a system of ducts to be installed throughout the home, which can be time-consuming and labor-intensive.

Requires ductwork

If the ductwork for a central AC unit is not installed correctly or is not undergo ongoing preventative maintenance, it can lead to energy loss, reduced efficiency, and decreased indoor air quality.

Mini Split vs Central Air: Pros and Cons Comparison

When it comes to choosing between a mini split vs central air conditioning system, there are several factors to consider. Let’s look at a comparison of the pros and cons of each system.

Energy Efficiency

Mini Split Pros:

  • High energy efficiency due to lack of ductwork
  • Inverter technology allows for precise cooling and reduces energy waste

Central Air Pros:

  • Efficient cooling for larger homes or buildings
  • Energy efficiency can be improved with proper ductwork maintenance

Mini Split Cons:

  • May not be efficient for larger homes or buildings
  • Higher upfront cost than window units or portable air conditioners

Central Air Cons:

  • Ducts can lead to energy loss and reduced efficiency
  • Less efficient for smaller homes or spaces

Cooling Power

Mini Split Pros:

  • Ideal for cooling individual rooms or spaces
  • Zoning capabilities allow for precise temperature control

Central Air Pros:

  • Powerful cooling capabilities for larger homes or buildings
  • Can cool multiple rooms or spaces at once

Mini Split Cons:

  • May not be powerful enough for larger homes or buildings
  • Requires a separate unit for each room or space

Central Air Cons:

  • May not be efficient for smaller homes or spaces
  • May require multiple units to cool larger homes or buildings

Installation

Mini Split Pros:

  • Easy installation with minimal disruption to the home
  • No ductwork required

Central Air Pros:

  • Can be installed during new construction or renovations
  • Professional installation ensures proper ductwork installation and system performance

Mini Split Cons:

  • Professional installation is still required
  • Higher upfront cost than window units or portable air conditioners

Central Air Cons:

  • Installation can be expensive and time-consuming
  • Requires ductwork installation, which can be difficult in older homes or buildings

Cost

Mini Split Pros:

  • Lower long-term energy costs
  • Only requires installation in rooms that need cooling

Central Air Pros:

  • Can increase home value
  • May be more affordable for larger homes or buildings

Mini Split Cons:

  • Higher upfront cost than window units or portable air conditioners
  • May require multiple units to cool larger homes or buildings

Central Air Cons:

  • Higher upfront cost than window units or portable air conditioners
  • Can be more expensive to install and maintain than mini-split systems

Maintenance

Mini Split Pros:

  • Easy to maintain and clean
  • Individual units can be turned off when not in use, reducing wear and tear

Central Air Pros:

  • Professional maintenance can improve system performance and efficiency
  • Air filters improve indoor air quality

Mini Split Cons:

  • Filters may need to be cleaned more frequently
  • Individual units require separate maintenance

Central Air Cons:

  • Ductwork can collect dust and debris, leading to decreased efficiency and indoor air quality
  • Regular maintenance is required to ensure optimal system performance

Choosing Between A Mini Split vs Cetral Air? Contact Bowman Mechanical Services

When it comes to choosing between a mini-split system vs a central air conditioning system, there are several factors to consider, including energy efficiency, cooling power, installation, cost, and maintenance. At Bowman Mechanical Services, we understand that this decision can be overwhelming, which is why we’re here to help.

Our team of experienced HVAC professionals can help you determine which system is best suited for your home or building. We’ll take into account your specific cooling needs, budget, and preferences to provide you with a customized recommendation that meets your unique requirements.

Our team is here to help you stay cool and comfortable all year long, so contact us today by calling [phone] or filling out the contact form below.

The Ultimate Guide to Troubleshooting a Gas Furnace’s Pilot Light

If you’ve ever woken up to a cold house to find yourself shivering in the sheer lack of heat in the home, your furnace and its pilot light might be malfunctioning. Maybe you’ve woken up, wondering why someone in your family lowered or shut off the heat only to learn that your heat is failing altogether because of a faulty pilot light.

If your furnace’s pilot light went out it won’t be able to ignite the gas to heat your home. This can be a frustrating, uncomfortable experience for everyone living in your house– especially during the colder months when you rely on your furnace to keep your home extra warm and cozy.

In order to help you understand your furnace’s pilot light and learn how to troubleshoot to reset your pilot light, our gas furnace repair technicians are presenting you with the ultimate guide to pilot light troubleshooting. 

What a Gas Furnace Pilot Light is and How it Works

A gas furnace pilot light is a small, continuously burning flame that serves as the ignition source for the gas burner in your home’s gas furnace or water heater. It is an essential component of your home’s furnace, as it ignites the fuel that heats the air that then becomes circulated throughout your indoor living space.

The pilot light is typically located near the furnace’s burner assembly and is powered by a small amount of gas that is supplied through its dedicated gas line. While many newer furnaces tend to use electronic ignition systems, many older furnaces still rely on a traditional pilot light to ignite the burner.

Importance of Maintaining a Properly Functioning Pilot Light

Without a functioning pilot light, your furnace will not be able to start. If your gas furnace doesn’t turn on you and your family will be left in a cold house that is failing to get heated. If you’re wondering why your furnace light won’t stay on, the best thing to do is schedule a service call with a local furnace inspection company. Proper maintenance and care of the pilot light are crucial to ensuring the safe and efficient operation of the gas furnace in your home.

Signs of a Faulty Pilot Light

A faulty pilot light in a gas furnace can cause a variety of issues, including insufficient heat, increased energy bills, and even potential safety hazards. 

Here are some common signs that your pilot light may be faulty:

  • No heat: If your furnace is blowing cold air or not emitting any heat, it could be due to a faulty pilot light. Without a functioning pilot light, the gas burners won’t ignite, and the furnace won’t be able to produce the heat needed to keep your house warm.
  • A yellow flame: A healthy pilot light flame should be blue, with a small yellow tip. If the flame of your pilot light is mostly yellow, it could be a sign of a dirty or clogged pilot light or a lack of oxygen. 
  • The pilot light keeps going out: If your pilot light keeps going out, it could be due to a variety of issues, including a dirty or clogged pilot light, a malfunctioning thermocouple, or a faulty gas valve.
  • The smell of gas: If you smell gas in your home, it could be due to a faulty pilot light. A gas leak can be a serious safety hazard and requires immediate attention from a licensed professional. If you smell gas in your home, contact a reputable gas furnace repair technician immediately. 
  • High energy bills: A faulty pilot light can cause your furnace to work less efficiently, leading to increased energy bills.

If you notice any of these signs that the pilot light on your gas furnace may be out, it’s important to contact a licensed HVAC furnace repair contractor to diagnose what is happening with your furnace and pilot light and repair the issue(s). Regular maintenance and inspections can also help to prevent pilot light issues and ensure that your furnace operates safely and efficiently when it needs to.

Pilot Light Troubleshooting Steps

If your gas furnace pilot light is not working, troubleshooting the issue by finding the cause of the furnace pilot light malfunction is key.

Here are some steps you can take to DIY troubleshoot a faulty pilot light at your home:

Check the Gas Supply

Make sure that the gas supply to the furnace is turned on and that the gas valve supplying gas to the furnace is fully open.

If the gas supply was turned on, you’ve discovered that it being off is not your furnace’s issue. Before you move ahead to perform any maintenance or repairs, make sure you turn the gas valve off so that you do not put yourself or your home in danger.

You then can continue to the next steps to troubleshoot the cause of your faulty pilot light.

Check For a Clogged Pilot Light

Check the pilot light opening as a clogged pilot light can cause the flame to burn improperly, leading to a weak or non-existent flame. Inspect the pilot light to ensure it’s clean and free from debris or buildup.

Inspect the Thermocouple

The thermocouple is a safety device that detects whether the pilot light is on and sends a signal to the gas valve to open or close it. If the thermocouple is dirty or damaged, it may not be able to detect the pilot light, preventing the furnace from being able to turn on.

Check for a Faulty Gas Valve

If the gas valve is not opening properly, the pilot light won’t ignite, preventing the furnace from heating your home.

Inspect the Ignition System

If your furnace has an electronic ignition system, make sure it’s working correctly. If the ignition system is not functioning properly, the pilot light won’t ignite, preventing your home from becoming warm and producing heat. 

If you’re not comfortable going through the process of troubleshooting the issue yourself, it’s best to call a licensed HVAC technician to diagnose the issue and perform any repairs on your home’s furnace. Attempting to repair a faulty pilot light without the proper knowledge and equipment can be dangerous, as you are working with combustibles. Regularly scheduled maintenance and HVAC inspections can help to prevent pilot light issues in your home, ensuring that your furnace is functioning properly. 

When to Call a Professional:

While some pilot light issues can be resolved with simple troubleshooting steps, there are some situations where it’s best to call a professional in pilot light repairs. 

Here are some signs that it’s time to call a professional furnace repair technician about the pilot light on your furnace going out: 

  • The presence of a gas smell: If you smell gas in your home, there may be excess gas flowing through your home that will or has already led to a gas leak. It’s important to contact a professional furnace repair expert right away. A gas leak can be a serious safety hazard and requires immediate attention from a licensed professional.
  • The pilot light won’t stay lit: If you’ve tried to light the pilot light multiple times and it won’t stay lit or the reset button does not seem to work, it could be due to a more serious issue, such as a faulty thermocouple or gas valve. A professional furnace repair specialist can diagnose and repair the issue safely and efficiently, getting your furnace up and running again, and making sure your pilot stays lit. 
  • Strange noises emanate from the furnace: If your pilot ignites but your furnace is making strange noises, such as rattling or popping, it could be a sign of a more serious issue. Contact a  professional certified in furnace repair and replacements to diagnose and fix the issue before it becomes a bigger problem.
  • A total lack of heat: If your furnace is not producing heat no matter how much you adjust the thermostat temperature to your desired setting, it could be due to a faulty pilot light or an issue with the gas or furnace, creating a more serious situation where you should have the unit serviced by a professional repair person with experience fixing pilot lights. 
  • The repairs are beyond your skill level: There is no reason to hesitate if your furnace needs repairs that are beyond your level of expertise or if you need a professional to replace your pilot light or furnace. Our pilot light repair professionals spend years gaining knowledge and experience in furnace repair and are ready and able to help make sense of whatever issue you are experiencing.

Contact the HVAC Professionals At Bowman Mechanical for Safe and Efficient Furnace and Pilot Light Repair

Some jobs are better left for licensed professionals, and at Bowman Mechanical Services we believe a faulty pilot light or a malfunctioning gas furnace that won’t relight is one of those jobs.

One of our Raleigh, North Carolina, and surrounding areas experts in furnace light repairs can come to your home and service your furnace’s pilot light. When our furnace repair specialist troubleshoots your pilot light, pilot valve, gas flow, and other components of your pilot light and furnace, you can gain the piece of mind that your home and everything and everyone in it is safe.

To get connected to one of our furnace repair professionals, call Bowman Professional Services today at [phone] or fill out the contact form below to get started.

Complete Guide To Geothermal Heat Pump Installation

If you are in the market for a new HVAC system to heat and cool your home, consider replacing your old, existing furnace with a geothermal heat pump system. A new heat pump that draws its energy from ground sources is affordable, energy-efficient, eco-friendly, and offers other great benefits to homeowners.

Our geothermal system installation experts at Bowman Mechanical Services are offering our complete guide to geothermal heat pump installation. We are here to help Raleigh and Garner area residents just like you make informed decisions for choosing a new heating and cooling system for North Carolina homes.

Introduction to Geothermal Heat Pumps

What exactly is a geothermal heat pump, and what sets it apart from other systems for heating and cooling? A geothermal HVAC system draws heat from the Earth and uses it to heat your home. Conventional heating systems burn oil to heat your home, using more energy to burn environmentally harmful fossil fuels.

A geothermal unit not only reduces the use of harmful fossil fuels but also offers long-term cost savings on electricity. When you have this new system installed to heat and cool your house, you are reducing your carbon footprint while enjoying the benefits of energy savings, tax rebates, and more.

Overview of Geothermal Heat Pumps

When someone first learns about geothermal heat pumps, it’s normal to have a lot of questions or even skepticism about how they work. For years we have relied on natural gas, other fuels, and electricity as sources to generate heat. To ease any worries about the performance of ground source heat pumps, let’s look at the details of how they operate.

Benefits of Installing Geothermal Heat Pump Systems

  • Lower cost: A geothermal heat pump saves homeowners between 30-60% on heating costs and between 20-50% on cooling costs.
  • Fast return on investment: While geothermal systems can have higher initial costs than most other HVAC units, the overall cost savings will be seen within only a couple of years of your unit’s new construction.
  • Environmentally friendly: A geothermal system is one of the most eco-friendly ways to generate heat in and out of your home. Using less energy to operate, heat pumps lower your carbon footprint and lower air pollution caused by harmful greenhouse gases used in other systems.
  • Quiet operation: There is no annoying noise when a heat pump turns on and off like with other types of units for heating and cooling.
  • Safe for you and your home: Since no combustive materials are used, a geothermal heat pump is safe to use and clean.
  • More comfortable: Geothermal heat pumps have been proven to improve the air quality in your home. If someone in your household has allergies or asthma, a heat pump unit will be much more pleasant as it operates to create an ideal balance of dehumidification and air purification.
  • Tax benefits: Local governments reward homeowners who install environmentally, energy-saving solutions in their homes, so anyone who installs a heat pump will receive tax benefits for it.
  • Long lifespan: Indoor components of the heat pump can last up to 25 years, while the ground loop system can last up to 50 years. This significantly surpasses the lifespan of other HVAC units.
  • Can be installed in all homes: Whether you install your heat pump in a new construction home or retrofit situations where there is existing ductwork, your home improvement efforts of installing a geothermal system will be well suited to any home environment.

How Do Geothermal Heat Pump Systems Work?

Heat is exchanged between the ground and the air when a heat pump is installed. A geothermal system differs from a conventional system like a furnace by moving heat from one source to another. Through a system of geothermal ground loops, your new heat pump unit will transfer heat from the ground to warm your home in the winter. In the summer, the geothermal heat pump will draw heat out of your home, and transfer it back into the ground. This transfer works to keep your house cool in the warmer months.

Geothermal Heat Pump Unit Types

There are several types of geothermal heat pump installations. Which type of unit will work best for your home will depend on the climate where you live, soil conditions, the size of your home that needs to be heated and cooled, and the local costs for the installation process.

Horizontal ground loops, vertical systems, and pond or lake loops are closed-loop systems that circulate heat through underground pipes. Open loop system pipes use a nearby water source like a well to circulate heat.

  • Horizontal system: Horizontal ground loops of layered coils and polyethylene pipes are buried in six-foot-deep trenches. This type of heat pump installation is ideal for approximately 2,000 square foot homes that have large ground space of up to 400 feet to build the trenches.
  • Vertical system: On properties with a limited amount of ground space, a vertical ground loop installation requires four-inch diameter holes to be drilled at 100 to 400 feet deep into the earth.
  • Pond/lake loop: Draws heat from a nearby lake or pond through a blanket of water that covers 10-foot-deep coils that are anchored onto racks to generate through the closed loop system.
  • Open loop: Open-loop pumps are water source heat pumps that use a nearby water source like a well. The pipe system cleans ground water to generate through the system and transform it into heat for your home.
Types of geothermal systems

Preparing for Geothermal Heat Pump Installation

If you are ready to convert your existing HVAC system into a geothermal heat pump system, our HVAC system installation professionals are happy to help you prepare your home for your new heat pump unit.

Evaluating Your Home’s Capability

When you make the decision to install a geothermal system on your property, one of the first steps is to evaluate your home’s capability through a heat pump inspection. Make an appointment with a local HVAC contractor to determine the heating and cooling needs of your home.

They will likely perform what is called a “Manual J” calculation. This includes evaluating the following details of your home:

  • Square footage.
  • Insulation.
  • Use of the space.
  • Calculate BTUs based on the number of people who live there, the number of windows, and the number of doors in the home.

By looking at the details above, your contractor can then calculate the amount of energy needed to heat and cool your home.

Selecting the Right Contractor

It’s important to select a local contractor with experience with the geothermal heating and cooling installation process. It’s always a good idea to read online reviews of your HVAC company as well as get opinions for several contractors. The process of installing ground source heat pumps is intensive, and should only be done by reputable, knowledgeable, and seasoned pros.

Bowman Mechanical Services is confident that we offer the very best geothermal unit installation, with our licensed contractors experienced in installing and repairing heat pumps all over the Raleigh area.

Determining an Appropriate Location for the System

There are certain land and soil requirements in order for your property to be a candidate for the installation of heat pump heating and cooling systems. Your heat pump experts will assess your candidacy for a heat pump based on:

  • The soil heat transfer rate.
  • Availability of space to install ground loops.
  • The amount of water saturation around your home.

Securing Necessary Permits and Approvals

The installation and maintenance of a geothermal heating and cooling system with ground-source heat pumps require permits and approval. To begin the installation process, you must have approval from local officials that your property will undergo a ground loop installation by a licensed geothermal heat pump contractor.

The Geothermal Installation Process

Once you secure your professional HVAC technicians and are approved for your new heat pump permit, it’s time to undergo the geothermal installation.

Step 1: Drilling and Ground Loops Installation

With the use of heavy machinery, trenches will be dug on your property to allow for the installation of the ground loop piping into the earth.

Step 2: Ductwork Installation (If Applicable)

If you have adequate existing ductwork, this step will not be necessary, but for homes that do not have existing ductwork, new ductwork will be installed to connect the ground loops to your heat pump.

Step 3: Heat Pump Installation

The heat pump unit will replace an existing furnace, boiler, or HVAC system. After removing the old system, the heat pump will be installed in its place to connect to ducts that connect to the ground loop system.

Step 4: Wiring Connections

Your heat pump system will be connected to the electricity in your home through connective wiring, making sure there is power generated to operate the system. Your new heat pump is assessed for proper operation and safety before the job is complete.

How Much Does It Cost To Install A Geothermal Heat Pump?

A geothermal system can cost anywhere between $18,000 to $30,000 for the average homeowner, but higher-end ground source heat pumps can cost up to $45,000 for the entire unit and installation.

It’s best to receive a quote from your trusted home heating and cooling professionals to determine the cost of your new heat pump system, but it’s important to note that most units pay for themselves in energy-saving costs within 3 to 5 years of installation.

Contact Bowman Mechanical For All Of Your Geothermal Heating And Cooling Needs

Are you ready to make the money-saving leap of converting your HVAC system to a geothermal ground heating and cooling system?

The expert contractors at Bowman Mechanical Services are happy to help you evaluate your home for heat pump eligibility and to install your new energy-saving heating and cooling unit.

Call us today at 919-679-9756 or reach out to us to schedule your free estimate on heating and cooling repairs and replacements.

How Does A Geothermal Heat Pump Work?

Geothermal heat pump systems are becoming an attractive option for homeowners who want to replace or update their current heating and cooling systems.

Our NC heating and air conditioning company has served Raleigh and Garner area clients for years. Recently, we’ve seen an increase in North Carolina homeowners who want to replace their outdated furnaces or old air conditioning systems with an energy-efficient option that keeps their homes comfortable year-round.

The solution to local residents’ heating and cooling systems needs is to install a ground loop system heat pump.

If you’re considering a new way to heat and cool your home that will save you money, reduce your carbon footprint, and maintain appropriate temperatures no matter the time of year, Bowman Mechanical Services is happy to share how geothermal heating and cooling systems work so you can determine if they are the best HVAC system solution for your home.

How A Geothermal Heat Pump Works

How Geothermal Systems Work

While air temperatures fluctuate constantly, the ground temperature at five to eight feet below the surface stays a consistent 55 to 60 degrees, which is much higher than average in the winter and definitely cooler than average in summer.

Ground source heat pumps rely on thermal energy that extracts this surface heat from the ground, processes it through an underground geothermal loop, transfers the heat into your home through a duct system, and then uses the energy to heat your home. Alternatively, the geothermal HVAC system works to exchange heat from the home back into the earth to generate geothermal cooling.

This entire ground source heat pump system uses renewable energy and is more energy-efficient and cost-efficient than conventional systems that burn fuel as their source of heat.

How Geothermal Heating Works

In the winter, the geothermal system works to draw heat from the ground and pump it into your home via the ground loop piping system. Heat is absorbed from within the earth where it then travels into your home and is dispersed and able to circulate through your home to warm it.

How Geothermal Air Conditioning Works

In the summer, the geothermal system pulls heat from the air in your home where it’s absorbed by temperature-conducting fluid that is continually flowing within a closed-loop system of pipes. The fluid absorbs the heat in your home, and travels down underground, allowing the heat to disperse with the ground acting as a heat sink before it travels back up into your home in a constant cycle.

Heat is continually transferred out of your home during cooling cycles keeping your home cool on even the hottest days.

Is a Geothermal Heating and Cooling System Right for Your Home?

It’s important to evaluate the needs of your house and family when choosing which HVAC is right for you.

When compared to traditional HVAC options like a furnace or other system, a geothermal system offers a few key benefits:

  • Lower utility bills: Heating and cooling your home make up a large portion of your electric and gas bills, but a geothermal system offers incredibly low operating costs. Homeowners can see as much as a 50 percent reduction in their utility bills in the winter and summer, saving them thousands of dollars a year.
  • Environmentally friendly: Because you’re not burning fuel or using large amounts of electricity, a geothermal heating and cooling system is sustainable and the best option for the environment of any other method of heating and cooling.
  • Long-Lasting Equipment: While furnaces, air conditioners, and other heat pumps have a life span of around 10 years, geothermal systems have a very long life span. The pipes can be expected to last at least 50 years, while the rest of the equipment lasts between 20 to 25 years on average.
  • Improves Home Value: When selling your home, having a geothermal heating and cooling system in place can make your home more attractive to potential buyers, and showing comps of your costs compared to surrounding neighbors can show the value of the system.
  • Low Maintenance: There are no heat exchangers, pilot lights, flue pipes, or outdoor units to worry about, making them easy to maintain.
  • Healthier for your home and the people in it: Geothermal units improve the air quality of your home, making it a more comfortable and livable space for anyone with allergies, asthma, or other breathing or health concerns.

While the initial installation costs for a geothermal heat pump system can be expensive, the long-term value and benefits make it an investment worth making for most homeowners.

Tax Incentives and Rebates for Installing Heat Pumps

When filing your income taxes, you will receive a tax credit for installing an energy-saving geothermal heat pump in your home. Fill out IRS Form 5695 for installing renewable energy equipment in your NC home. Local and federal governments are focused on finding ways to decrease the harmful use of greenhouse gases like fossil fuels that are burned when homeowners have furnaces or boilers. Therefore, homeowners who opt for environmentally friendly options like ground loop heating and cooling systems will receive tax incentives.

Disadvantages of Geothermal Heat Pumps

While the advantages of installing a thermal energy heat exchanger like a geothermal system far outweigh the disadvantages, it’s important to be fully informed on all the pros and cons whenever you are making a huge adjustment to any equipment in your home.

Some of the disadvantages of geothermal heat pumps are:

  • High upfront costs: The installation costs for geothermal heat pump units can range between $18,000 to $30,000 for most homeowners, with higher-end units going as high as $45,000. While these upfront costs are higher than other conventional systems, the amount of money saved over the course of 3 to 5 years in energy savings will more than makeup for these early expenses.
  • Landscape disruption: The installation process for geothermal heating and cooling systems involves extensive drilling and digging to build trenches and bury the underground pipes.
  • Not a DIY project: Unfortunately, there is no way to DIY a geothermal heat pump installation. In order to transfer your home’s system off of natural gas or a unit that uses extensive electricity to operate, you will need to consult with a highly experienced geothermal heat pump expert to evaluate your home, assess your property’s landscape, and install your new ground source heat pump.

Get a Quote for Geothermal Heating and Cooling in Raleigh Today

Are you ready to convert your home’s outdated HVAC system into one that will offer savings, improved air quality, and benefits to the environment? If you’d like to learn more about this innovative, energy-efficient system that transfers heat to regulate the temperature of your home, we can help.

What Is Cheaper, Gas Or Electric Heat?

Many of our Raleigh residential heating service customers ask us which is cheaper: gas vs electric heat?

Looking at the pros and cons of gas vs electric furnaces, heat pumps, and water heaters, we will do our best to consider all aspects of this long-running debate. From installation costs, energy costs, maintenance and repair expenses, how gas vs electric heat measure up when it comes to comparing utility bills, and other factors, let’s explore which heating system is better for your home and budget.

Gas versus Electric: The Great Debate

As you’re making your way through the cold North Carolina winter months, you’ve probably noticed the rise in heating costs if your home uses gas or electric furnaces. In fact, in October 2022, the U.S. Energy Information Administration reported its Winter Fuel Outlook. The report cites a 27%-28% increase in households that use natural gas or oil and a 10% increase in homes that use an electric heating system to stay warm.

As prices for both gas and electric heat continue to rise, the long-standing debate of which is better and cheaper marches on.

What is Gas Heat vs Electric Heat?

Natural gas has been used to heat homes for years, becoming a staple in American homes. While electric heat is relatively newer to US households, it’s been a contender for decades as a suitable alternative to gas and oil.

To really delve into the differences between gas and electric heat, it is important to understand how each heating system operates to heat your home.

Gas vs Electric Furnaces

Furnaces operate by converting either natural gas or electricity into a source of energy that circulates and warms the air throughout a space. A furnace’s forced air heating system is activated when your home’s thermostat goes down to a certain temperature, triggering the furnace’s effects because the air inside the house is cold.

In gas units, the thermostat triggers a pilot light, igniting the gas burner inside the furnace to burn fuel. In electric units, an electrical ignition system lights the furnace instead of a pilot light, and electricity functions as the source of your home’s heat.

Gas vs Electric Water Heaters

Water heaters also come in systems that operate off of either natural gas or electric heat. Gas water heaters, much like gas furnaces, use a pilot light that ignites and heats the water through a flue in the tank. This then generates heat by burning fuel from a propane tank or natural gas to keep your house from getting cold.

Electric water heaters bring in water through a dip tube, activating the metal heating elements submerged in the water of the tank to rise and heat your home. Electric water heaters, unlike gas water heaters, have a thermostat, pressure relief valve, and drain valve. Electric water heaters are plugged into an electrical supply, whereas gas water heaters are connected through a gas line.

Gas vs Electric Heat Pumps

When looking at how a heat pump works, once again electrical heat pumps generate energy from electricity whereas gas-fueled heat pumps use gas to draw heat. Comparing electrical appliances to gas appliances, heat pumps are great alternatives to both water heaters and furnaces because a heat pump transfers heat from the outside to the inside to keep warm in the winter and from the inside to the outside to keep cool in the summer.

While the concept for both heat pump systems is the same, how they pull in hot or cold air is a different story. Electric heat pumps use electrical power and a cooling agent, like freon, and no combustive materials. In contrast, gas heat pumps use combustive fuel from a gas supply to transfer hot and cold air.

Benefits of Gas Furnaces and Electric Furnaces

Looking at a head-to-head comparison of gas vs electric furnaces, let’s consider the pros and cons of each home heating system.

Pros and Cons of Gas Furnaces

Some advantages of gas furnaces over electric furnaces are:

  • Less expensive to operate.
  • Fast acting to heat your home.
  • Less energy is needed to heat a space.

Some disadvantages of gas furnaces, when compared to electric furnaces, are:

  • Shorter lifespan.
  • Initial costs of installation are higher.
  • The use of combustive materials makes safety a concern.
  • Burning fuels are harmful to the environment.

Pros and Cons of Electric Furnaces

Electric furnaces have some advantages over gas ones, such as:

  • Lower installation costs.
  • Longer lifespan.
  • The safer home heating option.

Like gas furnaces, electric furnaces have some drawbacks as well. Some disadvantages are:

  • Higher monthly energy bills.
  • It takes longer to generate heat.
  • Heating is less efficient in circulating throughout the whole home.

Which is Cheaper: Gas Heat or Electric Heat?

When it comes down directly to cost savings, electric furnaces have lower installation costs when compared to the higher installation and maintenance costs of gas furnaces. However, gas furnaces cost less to operate than electric ones. Due to the lower monthly electric bills, gas heat furnaces come out on top as the less expensive overall choice.

It’s important to note that the safety concerns and effect on the environment of gas furnaces are a big concern, so if you are looking at how an electric furnace will lower energy costs and how unreliable natural gas costs can tend to be from year to year, an electric furnace could be the better choice for you.

For optimal energy and cost savings, installing a new heat pump is the biggest money-saving choice you can make for your home and family.

Are Energy Prices Expected to Rise in 2023?

HVAC professionals have already announced that there will be an increase in energy prices for both gas heat and electric heat in 2023. From rises in natural gas prices to the increase in electric heating costs, energy consumption in the U.S. will see higher heating bills and operating costs.

If your home furnace or other heating and cooling system need repairs or if you are looking to replace your system with a more energy-efficient heat pump, our Raleigh heating and cooling installation experts can convert your current system into one that will save money or reduce your energy consumption.

Contact Bowman Mechanical For All Your Gas Furnace And Electric Heat Pump Needs

Are you looking for a new heating system for your NC home or does your current gas furnace or electric furnace need repairs? Our winter heating installation contractors at Bowman Mechanical are here to update your old heating system into a less expensive and more energy-efficient home heating system.

Contact us today at [phone] or fill out our contact form below to get started.

Why Your Furnace Won’t Stay On? Common Reasons For Failure

If you live in or around Raleigh or Garner, you know that we can sometimes get hit hard with cold weather here in North Carolina. As a result, it is imperative that your heating system works properly during a cold winter day or night when there are extreme temperatures.

If you are having issues with your furnace staying lit, our Bowman Mechanical Services experts in furnace malfunction issues are here to help you figure out why.

There are a lot of potential warning signs to diagnose why your furnace turns off- from minor issues like the buildup of dirt and debris to more severe safety concerns like issues with the gas line, it is important to have an HVAC furnace professional come to inspect and repair your system.

How Furnace Ignition Systems Work

Not all gas furnaces necessarily work exactly the same but for the most part, an average furnace ignition heating system will operate in a particular sequence.

Here’s how most furnaces operate in order to ignite:

  1. The thermostat signals for heat as a result of colder temps.
  2. The draft inducer motor starts to circulate fresh air, which is an important safety feature for the combustion chamber.
  3. The gas valve opens, transferring gas to the pilot burner. *If you have a direct ignition furnace, your furnace does not have a pilot light, but a flame sensor.
  4. An electrical spark ignites, turning the pilot light on. *Furnaces with a standing pilot light it must be lit directly by you in order to turn on.
  5. If the pilot light was lit successfully, the flame sensor alerts the furnace.
  6. Gas is transferred through the gas valves to the main burners of the furnace.

When gas is involved in the heating cycle, the safety concerns are significant, and the well-being of the members of your household is the priority. We suggest having an HVAC pro perform annual maintenance and prevention services on your old furnace to reduce the possibility of furnace problems.

However, if it’s too late and an issue is already occurring, restricting your furnace from operating correctly, it is important that you schedule a furnace repair as soon as possible.

What Commonly Goes Wrong With A Gas Furnace

Some of the common issues that cause gas furnaces to stop working or need repairs are:

  • Due to age your old furnace no longer operates.
  • The furnace is not the right size for your home.
  • Overheating because the heat exchanger gets too hot.
  • Insufficient airflow or insufficient gas pressure.
  • A defective, malfunctioning ignition board, flame sensor, light switch, thermostat, thermocouple, fan limiter, or draft inducer fan.
  • The drainage line is blocked, resulting in a full condensate pan.
  • Temperatures are so low that the furnace cannot stay lit.

Flame Sensor Is Triggered

The purpose of the flame sensor is to be certain the gas valve opens only when flames are burning. If the gas valve is open when the furnace is not lit, it could result in toxic gas buildup. This is extremely dangerous and can lead to a gas leak, fire, or gas explosion. While this sounds very scary, there are luckily warning signs before the worst-case scenario occurs.

Signs of gas accumulation in the valves due to a triggered flame sensor are:

  • Water leaks that puddle around the surface of the furnace.
  • The appearance of a yellow burner flame can be a sign that carbon monoxide is not filtering out of the system properly.
  • Rusted, corroded flue lines indicate CO gas is not properly filtering out of the system.
  • Your furnace’s old age is impacting the flame sensor operating in the right way.
  • High utility bills can often mean that you simply need an air filter replaced, but in more extreme circumstances with gas furnaces, unexpected increases in energy costs can also mean that the flame sensor is making it difficult for your heating system to work.

If you are worried you may be experiencing trouble with your flame sensor or that there is insufficient gas flow, your system needs to be inspected and repaired by a furnace burner expert.

The Thermostat Is Malfunctioning

Your thermostat is responsible for telling the furnace when to turn on and off, based on the temperatures in your home. If your thermostat is malfunctioning, that lack of communication with the heating system results in your furnace not knowing when to light.

If the thermostat is not operating properly, it can send the wrong signals to your furnace at the wrong times, resulting in an overheating furnace or other heating system problems.

How To Fix A Malfunctioning Thermostat?

A simple fix for a malfunctioning thermostat is to buy a new thermostat, and hopefully, the equipment will communicate with your gas furnace to reach the desired temperature. In case there is a more advanced issue, calling an HVAC pro is always your best solution to fixing a bad thermostat and helping it function properly.

Your Furnace Has A Defective Draft Inducer Motor

A draft inducer fan vents out any gases from the combustion chamber. The motor then continues to circulate oxygen to the furnace burner.

When the draft inducer motor is not working correctly, the pressure switch that measures airflow will not detect the flow of air at the correct rate, causing the heat exchanger to close. In contrast, it’s possible for the pressure switch to affect air circulation by not allowing the heat exchanger to close at all.

Older gas furnaces do not all have draft inducer motors, but most newer furnace heating systems will.

How To Fix A Defective Draft Inducer Motor?

Most draft inducer designs are complicated and unless you are an HVAC pro professionally trained to repair furnace system parts like a blower motor, pressure switch, and draft fans you can ultimately end up making the system worse overall. When dealing with gas furnace motors and switches, we always recommend leaving system repairs to professionals.

Your Furnace Has A Dirty Flame Sensor

One of the most common issues with malfunctioning gas furnace systems is a dirty flame sensor. The easiest way to diagnose this issue is to pay attention to the time frame between your furnace turning on and then off again. If your furnace turns on several times and, within seconds, turns back off that’s a clear sign that your home’s furnace issue is due to a dirty flame sensor.

An important safety measure to take is to install a flame sensor that is designed to turn off the gas valve when no flame is detected. A flame sensor with the safety feature of automatically turning off the flow of gas when the pilot light doesn’t lite can keep your home and family out of harm’s way.

How To Fix A Dirty Flame Sensor?

Cleaning the flame sensor is the only way to fix it when it’s dirty, but it is easier said than done. We recommend scheduling a service with our gas furnace experts rather than trying to clean it yourself.

If you do opt to try cleaning the flame sensor on your own, it’s vital you do it correctly. Here is the sequence of how to troubleshoot a flame sensor in need of cleaning:

  1. Turn your furnace off entirely.
  2. Access the flame sensor by opening the door to the combustion chamber.
  3. Remove the sensor and clean it off rust, dirt, and buildup with light-grit sandpaper, emery cloth, or steel wool.
  4. Replace the sensor.
  5. Test your system to see if the issue is resolved.

The Furnace’s Thermocouple Is Broken Or Malfunctioning

The thermocouple detects if the furnace pilot light is functioning properly. When the furnace’s pilot light is out, the thermocouple will prevent unburned gas from flowing through the valves by closing them. When the thermocouple is broken, the gas valves function abnormally, causing furnace issues.

How Can I Fix A Broken Thermocouple?

Not to sound repetitive, but we again would recommend leaving a malfunctioning thermocouple repair to someone with knowledge and experience in furnace repair.

We want our local homeowners to remain safe, and while it can be frustrating to not have your furnace turn on properly, particularly in the cold winter months, putting your household in danger of gas coming through the valve and starting a fire is not worth taking gas furnace issues into your own hands.

Heat Exchanger Is Broken

A faulty heat exchanger is one of the common culprits to not keeping your pilot light lit. Heat exchangers use a limit switch that shuts the furnace when it’s overheated. When the heat exchanger is broken, their job of detecting those heat temperature levels isn’t being performed, resulting in furnace overheating.

What Does A Broken Heat Exchanger Mean For My System?

When your heat exchanger is constantly overheating, it limits the venting of combustible gases. When those gases are not vented out of your system, they can potentially lead to gas leaks, catch fire, or explode.

You guessed it! You should absolutely have an HVAC pro come to your home to service your broken heat exchanger and eliminate any potential issues that can lead to expensive, harmful outcomes.

If Your Home Furnace Won’t Stay Lit, Contact Bowman Mechanical’s Repair Services Today

We believe that keeping your home safe is the top priority for our clients. If your home’s gas furnace pilot light won’t stay lit, do not make the mistake of taking it into your own hands. Instead, call our professional team of furnace technicians at Bowman Mechanical Services.

Our HVAC pros will inspect and troubleshoot your furnace, and get all the heating components working properly to keep you and your family safe and warm this winter.

Contact us at [phone] or fill out the form below to perform an annual maintenance or repair service to your home furnace.